Instalar DSM en Proxmox
Create a new virtual machine
General

Select :
- VM ID: 107
- Name: XpenoDsm62x
Click NEXT
OS
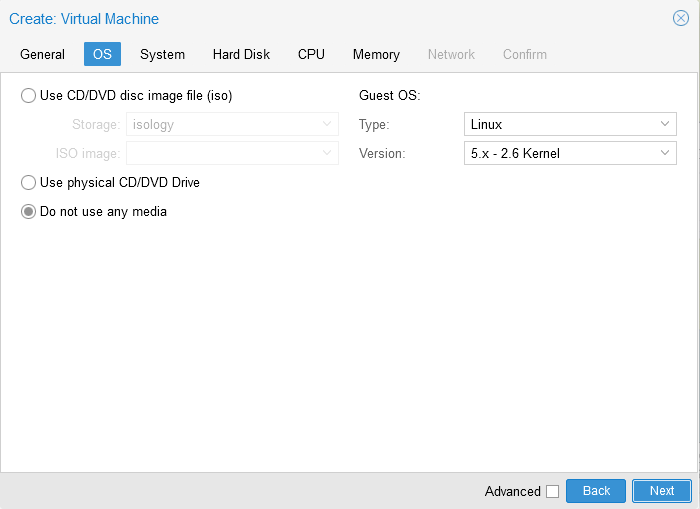
Select : Do not use any media
Guest OS, Select :
- Type: Linux
- Version: 5.x – 2.6 Kernel
Click NEXT
System
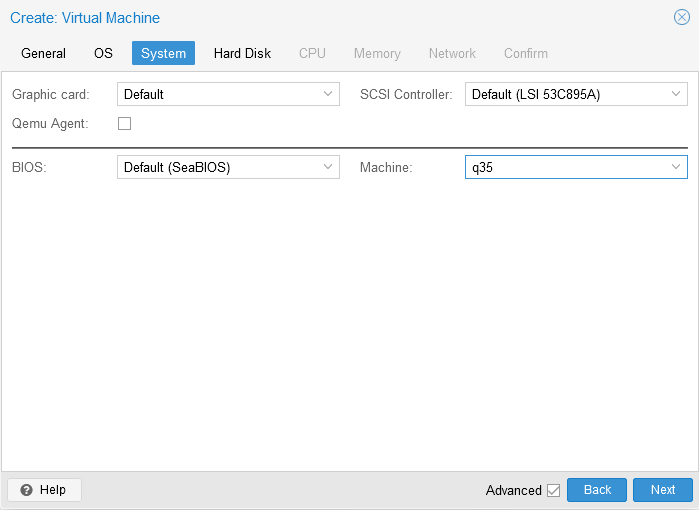
(Check «Advanced» checkbox at the bottom)
Select:
- Graphic Card: none
- SCSI Controller: Default (LSI 53C895A)
- BIOS: default (SeaBIOS)
- Machine: q35
Click NEXT
Hard Disk
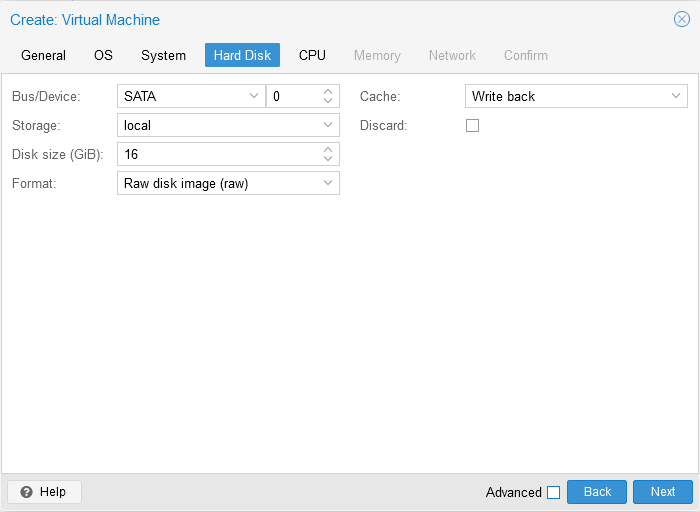
(Uncheck «Advanced» checkbox at the bottom)
Select :
- Bus/Device: SATA 0
- Storage: local
- Disk size (GB): 16
- Format: Raw disk image (raw)
- Cache: Write back
- Discard: uncheck
Click NEXT
CPU
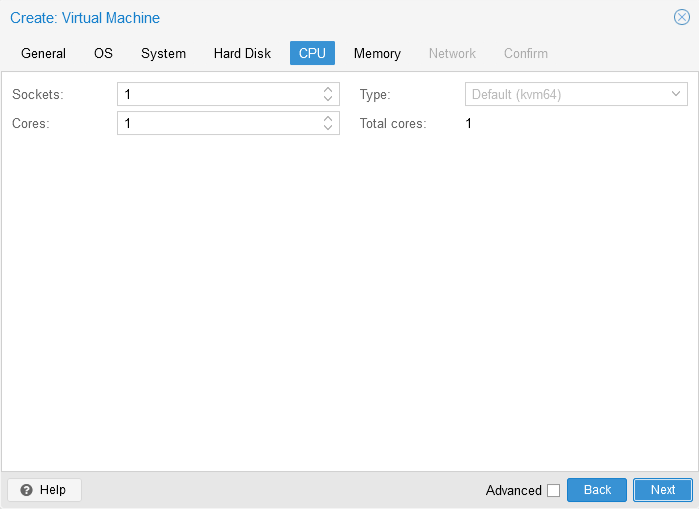
Select :
- Sockets: 1
- Cores: 1
- Type: Default (kvm64)
Click NEXT
Memory
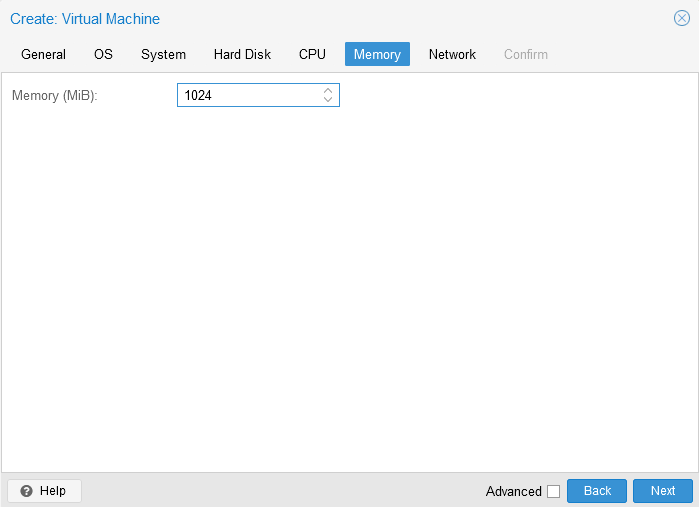
Select :
- Memory (MB): 1024 (or 512)
- (In Avanced mode) Ballooning Device: Uncheck (or Check if bootloader support it)
Click NEXT
Network
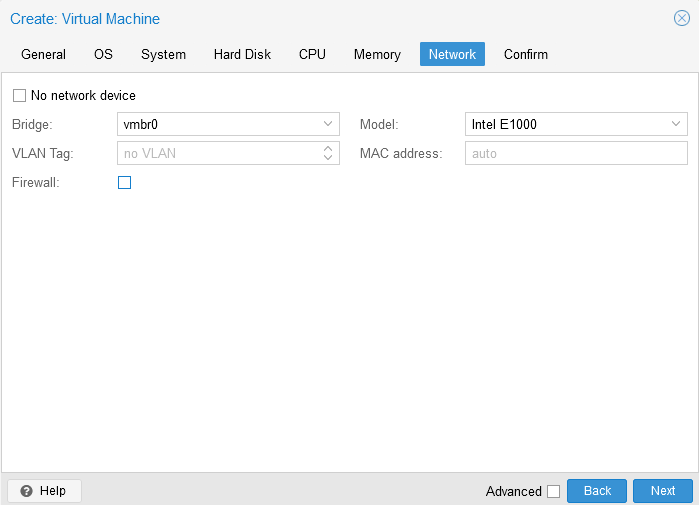
Select
- Bridge: vmbr0 (or other of your proxmox)
- Model: Intel E1000 (or choose VirtIO if bootloader support it)
- Firewall: uncheck
Click NEXT
Confirm
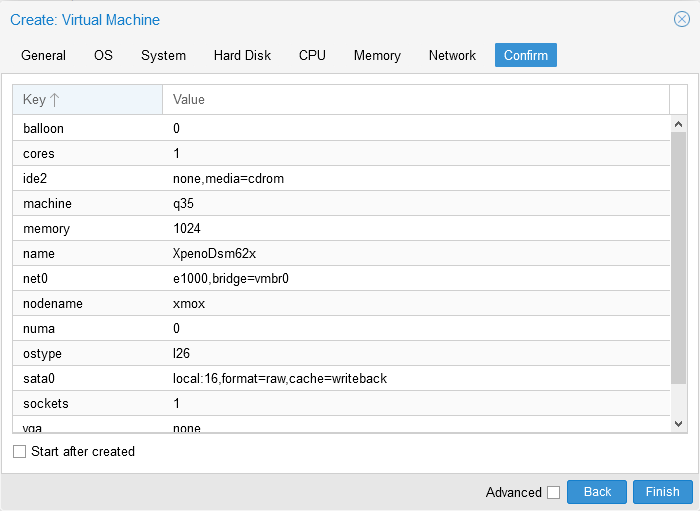
Check config
Click on FINISH
Hardware – Serial Port

On Hardware tab,
Click on Add button
Then Select Serial Port
Then Enter: Serial Port: 0
Click on Add button to validate
Options – Boot Order
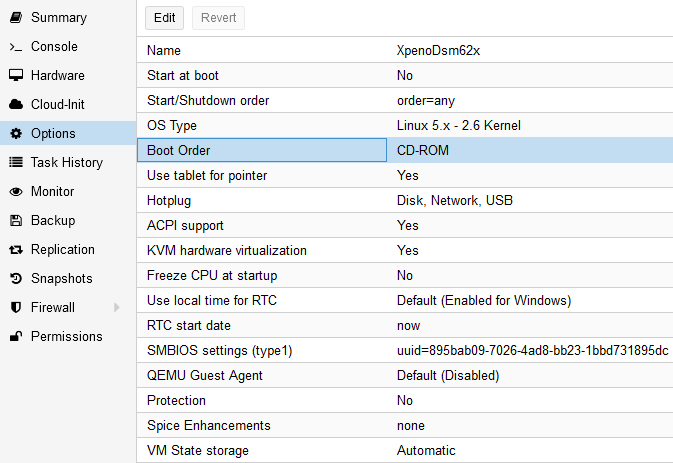
On Options tab,
Select on Boot Order line
Then Click on Edit button
Then Select:
- Boot device 1:
CD-ROM - Boot device 2:
none - Boot device 3:
none
Then Click on OK button to validate
(Optional) Use tablet for pointer: No
Bootloader copy
Copy xpenology Jun’s bootloader, previously downloaded, to proxmox server as /var/lib/vz/images/107/synoboot.img.
For that, you can use ftp or scp (or pscp for older windows).
In example:pscp.exe "synoboot_103b_ds3615xs_virtio_9p.img" root@192.168.0.2:/var/lib/vz/images/107/synoboot.img
scp.exe "synoboot_103b_ds3615xs_virtio_9p.img" root@192.168.0.2:/var/lib/vz/images/107/synoboot.img
VM conf manual modification
We will do custom configuration to add the bootloader as usb disk with high priority boot.
On proxmox server, open a shell as root, and execute the following command: (Substitute your <VM ID> if not 107)
# Add synoboot.img as USB drive[root@proxmox]$echo"args: -device 'nec-usb-xhci,id=usb-bus0,multifunction=on' -drive 'file=/var/lib/vz/images/107/synoboot.img,media=disk,format=raw,if=none,id=drive-disk-bootloader' -device 'usb-storage,bus=usb-bus0.0,port=1,drive=drive-disk-bootloader,id=usb-disk-bootloader,bootindex=999,removable=on'">>/etc/pve/qemu-server/107.conf
In the end, /etc/pve/qemu-server/107.conf file should look like that:/etc/pve/qemu-server/107.conf
args: -device 'nec-usb-xhci,id=usb-bus0,multifunction=on' -drive 'file=/var/lib/vz/images/107/synoboot_103b_ds3615xs_virtio_9p.img,media=disk,format=raw,if=none,id=drive-disk-bootloader' -device 'usb-storage,bus=usb-bus0.0,port=1,drive=drive-disk-bootloader,id=usb-disk-bootloader,bootindex=999,removable=on'balloon: 0boot: dcores: 1ide2: none,media=cdrommachine: q35memory: 1024name: XpenoDsm62xnet0: e1000=42:5A:BB:A3:B5:89,bridge=vmbr0numa: 0ostype: l26sata0: local:107/vm-107-disk-0.raw,cache=writeback,size=16Gserial0: socketsmbios1: uuid=895bab09-7026-4ad8-bb23-1bbd731895dcsockets: 1vga: none
Start VM
For the first run, we gonna start the vm in command line.
Open a terminal on proxmox server as root:
# Start and open terminal on serial port[root]$qm start 107 && qm terminal 107GNU GRUB version 2.02~beta2-36ubuntu3.14+----------------------------------------------------------------------------+|*DS3615xs 6.2 Baremetal with Jun's Mod v1.03b || DS3615xs 6.2 Baremetal with Jun's Mod v1.03b Reinstall || DS3615xs 6.2 VMWare/ESXI with Jun's Mod v1.03b || || || || || || || || || |+----------------------------------------------------------------------------+Use the ^ and v keys to select which entry is highlighted.Press enter to boot the selected OS, `e' to edit the commandsbefore booting or `c' for a command-line.Intro:This mod is brought to you by Jun <haijun.dev @ gmail.com>. You can contact me todiscuss technical details, but general installation questions should go throughthe xpenology forum or other communities.Happy hacking.Screen will stop updating shortly, please open http://find.synology.com tocontinue[ ... ]START /linuxrc.synoInsert basic USB modules...:: Loading module usb-common ... [ OK ]:: Loading module usbcore ... [ OK ]:: Loading module ehci-hcd ... [ OK ][ ... ]udhcpc (v1.16.1) startedeth0 Link encap:Ethernet HWaddr 00:11:32:2C:A7:85inet addr:169.254.58.122 Bcast:169.254.255.255 Mask:255.255.0.0UP BROADCAST RUNNING MULTICAST MTU:1500 Metric:1RX packets:43 errors:0 dropped:0 overruns:0 frame:0TX packets:6 errors:0 dropped:0 overruns:0 carrier:0collisions:0 txqueuelen:1000RX bytes:13450 (13.1 KiB) TX bytes:890 (890.0 B)lo Link encap:Local Loopbackinet addr:127.0.0.1 Mask:255.0.0.0UP LOOPBACK RUNNING MTU:65536 Metric:1RX packets:0 errors:0 dropped:0 overruns:0 frame:0TX packets:0 errors:0 dropped:0 overruns:0 carrier:0collisions:0 txqueuelen:0RX bytes:0 (0.0 B) TX bytes:0 (0.0 B):: Starting syslogd ... [ OK ]:: Starting scemd:: Starting services in backgroundStarting findhostd in flash_rd...Starting services in flash_rd...Running /usr/syno/etc/rc.d/J01httpd.sh...Starting httpd:80 in flash_rd...Starting httpd:5000 in flash_rd...Running /usr/syno/etc/rc.d/J03ssdpd.sh.../usr/bin/minissdpd -i eth0(15): upnp:rootdevice(51): uuid:upnp_SynologyNAS-0011322ca785::upnp:rootdevice(56): Synology/synology_bromolow_3615xs/6.2-25426/192.168.0.29(45): http://192.168.0.29:5000/description-eth0.xmlConnected.done./usr/syno/bin/reg_ssdp_service 192.168.0.29 0011322ca785 6.2-25426 synology_bromolow_3615xs eth0Running /usr/syno/etc/rc.d/J04synoagentregisterd.sh...Starting synoagentregisterd...Running /usr/syno/etc/rc.d/J30DisableNCQ.sh...Running /usr/syno/etc/rc.d/J80ADTFanControl.sh...Running /usr/syno/etc/rc.d/J98nbnsd.sh...Starting nbnsd...Running /usr/syno/etc/rc.d/J99avahi.sh...Starting Avahi mDNS/DNS-SD Daemoncname_load_conf failed:/var/tmp/nginx/avahi-aliases.conf:: Loading module hid ... [ OK ]:: Loading module usbhid ... [ OK ]============ Date ============Sat Oct 24 17:07:34 UTC 2020==============================starting pid 7262, tty '': '/sbin/getty 115200 console'Sat Oct 24 17:07:35 2020DiskStation login:
Press Ctrl + o keys to exit from virtual terminal
If everything goes well, in the end, you should see «DiskStation login» prompt and the ip address acquired from dhcp, which is «192.168.0.29» in this case.
We are now ready to install Synology DSM.